
|
Home |
| Attendant P | |
 |
 |
 |
 |
When you have finished installing the Attendant P program on the attendant console, start the program.
The first time you start Attendant P, a window automatically opens in which you can select the language for Attendant P.

Click OK to confirm your selection. The Settings window automatically opens. You can configure the Attendant P using this window.
(To access this window, select the Settings option from the File menu.)

Enter data under the seven tabs using the following procedures.
Select the PC COM port needed by the UP0/E PCI card (COM3 or COM4) or the port to which the optiset control/data adapter of a system telephone is connected (usually COM2).
If a Hicom Attendant B Office braille console (available only for certain countries and languages) is installed on the PC, you also must enter the COM port to which the keyboard is connected and select the Activated option.
In the first text box under the Calls tab, define the number of calls (threshold value) above which a visual warning will be issued. At this point, the color of the bar indicator for all pending calls in the call display changes from green to red.

In the other text boxes under this tab, specify the paths to the wave files (included in the software package) for ringer signaling on the PC. You can choose from among six different ringer signals for external, internal and personal calls.
When you select the Activated option, the ringer signal is played over one or two additional speakers that are connected to the sound card when you receive an incoming call.
Under the System tab, you can enter general settings for the attendant console.

 |
System Update: The System Update button allows you to request the data needed by the Attendant P from the system. |
|
Pause character: You can define a character which you will use to generate a deliberate dial pause, for example after dialing the external code (not necessary for digital exchanges). |
|
Trunk seizure with: For Attendant P Release 1.0 only: Enter the external code for the "transfer trunk" function here. This no longer applies in Attendant P Release 2.0 and later. |
|
Number redial only for external numbers: This option allows you to restrict the number redial list to external calls. |
|
Deactivate night answer at start: If you select this option, night answer is automatically deactivated (if it was previously activated) when the Attendant P is started. |
|
Activate silent call at start: If you select this option, the telephone ringer, and thus the ringer signal, is automatically deactivated when the Attendant P is started (does not apply if you have a UP0/E card. |
|
Call detail file: All chargeable phone calls and their values are stored in the call detail file. Enter the path to the call detail file. All chargeable phone calls and their values are stored here. The call charges are recorded in the file only if the system administrator has configured call detail recording in the system. If it is configured, you will see a check mark next to the Activated option. |
Under the Paging tab, you can configure the existing groups in the communication system as active announcement groups.

From the Existing groups box, select the groups that you want to be able to reach with a speaker announcement and transfer them to the Active announcement groups box.
The Paging menu option is now displayed in the Attendant P menu bar. This menu option allows you to issue speaker announcements to the configured groups.
Use the Repdial keys tab to program the ten station numbers or codes you use the most on repertory dial keys. A sequence of codes can be used to control a voice mail system or an answering machine or activate functions on the communication server (such as entering "#82 to display the caller list).
Under the Repdial keys tab, you can configure repertory dial keys for ten frequently used station numbers or codes (such as for controlling a voice mail system or answering machine).

In the input fields, enter either the name and station number of the station your wish to reach or the name and code for cintrolling a voice mail system or answering machine.
The Repdial keys menu option is now displayed in the Attendant P menu bar. This option provides you with a pull-down menu from which you can call the configured stations and access the configured functions directly.
You can enter up to eight different night destinations under the Night destinations tab. You can then select the Change night dest. option from the Edit menu to choose a night destination and activate it by clicking the night answer button in the toolbar. All calls are then forwarded to this
destination.


|
Special features must be taken into consideration if your Attendant P operates with HiPath AllServe (system networking via PC network)  ! !
|
You can enter the settings for the busy lamp field (BLF) under the BLF tab. The BLF consists of two to four groups, each containing 240 status keys that you can use to call system users directly. You can assign an internal station to each status key, and each keys display either the number (in station number mode) or the name (in name mode) of the internal station assigned to it.
|
In station number mode: two groups of 120 stations each. |
|
In name mode: four groups of 60 stations each. |
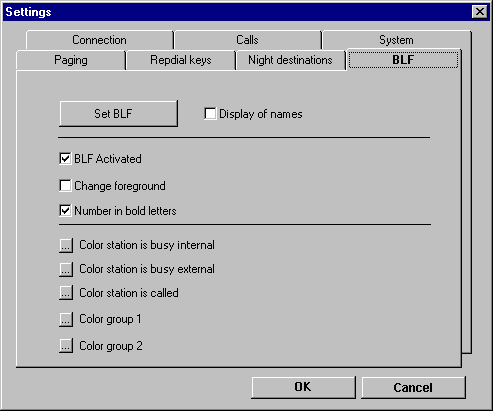
Use the BLF tab to set the following modes for the BLF:
|
Station number mode: The Display name option is not selected. The BLF displays the numbers of the internal stations. This is the default mode. |
|
Name mode: The Display name option is selected. The BLF displays the names of the internal stations to which the numbers were assigned in the system. To switch to name mode, you must first import the names from the system using the System Update and Set BLF buttons. |
When you click the Set BLF button at the top of the tab, the system first removes all station numbers from the BLF and then enters the stations configured in the communication system, sorted by number. For example, if a station configured in the BLF is assigned another station number, its station number in the BLF is not replaced until you update the BLF.
The Set BLF button is active only in station number mode.
|
|
The first time you start the Attendant P, you must click the Set BLF button to transfer all system users to the BLF. |
If you want the busy lamp field to load automatically whenever Attendant P starts up, select the BLF activated option in the middle of the tab.
You can decide whether the label (foreground) or the background of the status keys in the BLF will change color when a station is called or is busy.
You can also display the labels on the status keys in bold characters.
In the bottom section of the tab, you can change various color settings for the the status keys:
|
Color for internal station busy: Status key color when the internal station is busy. |
|
Color for external station busy: Status key color when the external station is busy. |
|
Color station is called: Color of the status button when the station is being called. |
|
Color group 1: Background color for Group 1 tab. |
|
Color group 2: Background color for Group 2 tab. |
Example: If a status button has a gray background, the station if free. If the background is dark red, the station is busy with an external call; if it is light red, the station is busy with an internal call. If the station is being called, the background of the status button turns yellow.
 |
||||
|
||||
|
|
|
||
| HiPath 3000 User and Installation Manual Attendant P | Siemens Part No.: P31003-M1551-B874-3-7619 | Conversion Date: 2002-02-25 | |
| © Siemens AG 2002 | |||